Been working hard at the studio, all to finish this piece for an upcoming auction. The title of the work is "The Measure of Her Fortitude." It's a mixed media piece incorporating found objects including a quail egg, sparrow's nest, Victorian brass hardware pieces, antique ruler, fossilized nautilus shell, animal bone, Bakelite and bone beads, beeswax, tarot card, watch face, hemp thread, vintage rusted tin container, old metal frame, powdered pigments, wood, wire, nails, paint and glue. It measures about 15" in height. There's quite a bit of depth and dimension to the piece which was hard to capture completely in the photos, so I've uploaded two very differently lit pictures to try to convey this. First, with top-down lighting --
+edit.jpg)
And this one, lit from both sides which emphasizes the depth of the frame behind the central image --
+edit.jpg)
.jpg)
.jpg)
.jpg)
.jpg)
+edit.jpg)
I had so much fun doing this. It's actually a re-working of a piece I started in a deMeng workshop last fall and which I even uploaded a picture of here in this blog a few months ago.
My favorite element is the sparrow's nest material tucked into the lower part, inside a turned-up Victorian drawer pull. The color of the nest was much grayer than I wanted so I mixed in some gold colored hemp thread to warm it up. It worked out quite well (below hangs an amber Bakelite bead and an animal's femur bone) -
.jpg)
Up on top is the nautilus shell and the quail egg. I devised a way to reinforce the egg so that breakage is unlikely, even though it sits freely on the wire and can rotate around. I really love sculpture with moving parts -
.jpg)
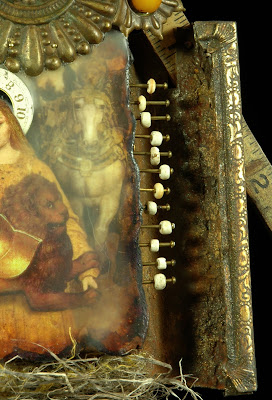
And below is another "moving part" element -- the bone beads threaded onto brass nails on either side of the central image. The beads move back and forth giving the whole thing an abacus-like feel. Between the beads and the metal frame piece you can just make out the textured surface where I tried to match the rusted metal. I tried to keep as much of the rusted metal showing, but as I had to affix the metal frame pieces with some epoxy putty I needed to cover that up to match the rusted tin. Powdered pigments really helped with this --
.jpg)
And here's the back of the piece, showing the backside of the old rusty tin. I love that burnished and rusted gold surface and didn't want to hide it, although the other side of the piece is just rusted tin with no old gold paint on it. You can also see some of the ways I attached all the pieces together. I used rivets (hard to see, but they're there) to attach the wood rulers to the tin, and brass nails to secure the wood piece in the center (the tarot image is on top of the wood). Down at the bottom are a couple of Lowes-bought brass machine screws and nuts. They were shiny-brand-spanking-new, which I burnished on the front side of the piece to match the aged look, but on the back here I just left them new and shiny. I threaded some brass wire through holes drilled into the tin to create something to hang the piece on a wall -
.jpg)