
Tuesday, November 30, 2010
So here's what 45 minutes can produce, while listening to Yo-Yo Ma, which was the perfect music for today. But this is just a start. Still very rough and in need of refinement of planes, not to mention details. I plan to play with it some more (and hopefully know when to stop). One of the most enjoyable things about this particular work was that it felt as though my hands were far more knowledgeable about the subtler forms of the face and head. Much more confident. Clearly the skull sculpt has been a valuable exercise (although I didn't touch it today).

Wednesday, November 10, 2010
I'm sure doing all these deep muscles is overkill, but I'm honestly having fun. Still struggling with trying to figure out which muscles go under others and which go over, especially for these deep muscles, but I'm hoping it'll all work out in the end. I do have a 3-D model of a facial ecorche but the deep muscles don't show, so it's not much help at this point.

Both of the muscles around the eye socket and the mouth start with "Orbicularis", which I'm guessing means something like "circular muscle", since they're both uniquely round (I haven't yet drawn in the muscles fibers on the mouth below, so it looks more smooth and skin-like -- I'll fix that next time).

Front view -- it looks a little off proportionally, but I think that's because I haven't put in the cartilage and muscles around the nose. Once that's in the nose will appear a bit lower than the nasal hole that's there now.

Tuesday, November 9, 2010
All that careful work I did on the right side of the skull, and now you're going to see the roughly-finished left side since that's the side I'm doing the musculature on. Oh well.. it'll soon be covered.
Now that I'm on to the ecorche' part I'm relying most heavily on a fantastic book -- Human Anatomy for Artists, by Eliot Goldfinger. A great resource as it isolates each individual muscle, showing exactly where it lies, where the origin and insertion points are and how thick it is. It's not a 3-D model, but it's the next best thing thanks to the thorough explanations and illustrations. It wasn't as helpful in modeling the skull, but for the muscles this book is great. My only complaint is that it doesn't seem to be laid out in the order that a sculptor would lay on the muscles, so I'm jumping around in the book and trying to figure out which muscles lie under and over each other. A bit of a challenge, but good for learning.

Friday, November 5, 2010
Skeletal part is *done*. I added the first rib and the front of the clavicles since some of the neck muscles attach there. Not having a full size skeleton model, though, I mostly roughed these in. I went to study an actual human skeleton that a friend of mine has access to, but while it helped some there were limitations. Nothing beats having a model right next to your sculpture to refer to, but I could only take photos of this specimen for my use. And anyway, it was a 4' 10" tiny little specimen, so it was like looking at a somewhat miniaturized version. But finally it's on to the musculature!
.JPG)
Wednesday, October 20, 2010
Felt a little bit like a dentist today, spending much of my time on the teeth. Thank god for those little rubber-tipped clay tools. They were perfect for this particular job. I still need to go back and lengthen the front couple of teeth a bit and adjust the gum line down in front (hmm... the bony part is probably not referred to as "gums", true?), but it's coming along. I also did some major tweaking to the mandible as well as the whole back half-hemisphere of the skull, removing a significant amount of clay. Still a lot more to do to get it refined to the level I want it, but the end is in sight. You can see the two skull models I've been working from below. Big differences between the two! The one on the right is a female skull, but the bony parts around the teeth are significantly eroded, so I'm glad to have the other skull to fill in the missing information.
.JPG)
A little glimpse at my work set-up. I've been keeping track of my hours on this project and it's been about 40 hours so far, not including the time on the armature.
.JPG)
Tuesday, October 19, 2010
Wrapping up the cervical spine. I wouldn't call it perfectly rendered, but I think it's decent enough to call good. For now. Most importantly, I've learned a lot about about the specifics of the forms of the vertebrae, with much thanks to the model I purchased. I'm convinced that when it comes to learning artistic anatomy, your money is generally better spent purchasing quality models than taking a class. And what's next? Tomorrow I'll revisit the skull and start the final refinements. Not sure I'll get to the ecorche' this week, but definitely soon..
.JPG)
.JPG)
Thursday, October 14, 2010
Just wasn't in the mood to work on the skull project today. The tedium of working from educational models is getting to me and my hands want to do more expressive things. So today was more clay-doodling. Although it looks like one piece in the photo below, these are two separate pieces. Did the head study first (second photo below to show a different angle), then it was back to the mouth/lip studies that I find so fascinating. This one's way off. I feel out of practice. Next move will be to work up some drawing studies. Hopefully between drawing and modeling (over and over) I'll start to get this down someday.
.JPG)
.JPG)
Thursday, October 7, 2010
Ironically, my neck is sore from working on this neck. I've got my sculpture stand cranked up to the highest mark but with all this detail and oddly curved bits and pieces I'm craning my neck plenty to get them all worked out. Spent the day on just this one profile side of the vertebrae and got about halfway up the front side (you can see below just how rough the upper part of the front of the neck is). The other side of the neck is going to be trickier because the threaded rod of the armature isn't on center and so will be exposed. I'll have to carve the vertebrae around it, which will be bothersome... so I've decided to make that side the one I'll do the ecorche' on. Which means I'm not going to fuss so much with modeling every last detail of the vertebrae on that side since it'll all be covered with muscle anyway. But *this* side I want looking nice. I'll put up with whatever neck pain I need to in order to get it looking decent.
.JPG)
Wednesday, October 6, 2010
Reason #48 for why it's nice to live in a big city: It's no problem to skip down to your local anatomical models manufacturer and pick up a decent cervical spine model.
Yes, I bought a model and what a difference it makes! In the same time it took me to (very poorly) model just one vertebrae yesterday, I roughed out all seven today, including reworking the one I took a stab at yesterday. Still lots of adjusting and tweaking and refining to do on these, but it's coming along very quickly now --
.JPG) And here's my new buddy, come to save the day (cue angelic choir):
And here's my new buddy, come to save the day (cue angelic choir):.JPG)
Tuesday, October 5, 2010
I've become quite stuck. With no good life-size model of the cervical vertebral column to work with I'm having a hard time modeling this part. I brought in a bunch of printed images today but vertebrae are like the pelvic bone, so full of twists and turns, strange curves and protrusions that you really need a 3-dimensional model to truly understand it. Spent several hours today *just* on the atlas, the top-most vertebrae. ... ugh ... But I'll tell you this -- the first two vertebrae of the spinal column, the atlas and the axis, are really wonderful and amazing bones.
.JPG)
But given the challenge of sculpting such convoluted 3-dimensional forms from 2-D images, I'm debating now whether to spring for a (cheap) 3-D model of this part of the spine, or if I should just go ahead and create a very generalized (and probably incorrect in more ways than I want to consider) cervical column, remembering that my whole goal with this project is to learn the basic underlying structure of the head and neck. I don't need to model absolutely perfect vertebrae to get a good working knowledge of the musculature of the neck. But then, I love these sorts of challenges and take great delight in learning all the subtleties of form.
Monday, October 4, 2010
Just the start of the rough shapes of the cervical vertebrae. A little challenging since I don't have any good life-sized models. Even my anatomy books don't show these vertebrae very well. It's got me thinking now -- maybe Santa will bring me a decent full-sized skeleton for Christmas?
.JPG) All this technical work. It's good knowledge to have but is not what I want to do ultimately. I much prefer a sort of 'abstracted realism' approach at this point in my aesthetic sensibility. The other thing about doing technical "copy from sight" exercises is that they lack the kind of generative creativity I crave. Nachmanovitch writes, "Competance that loses a sense of its roots in the playful spirit becomes ensconced in rigid forms of professionalism." Precisely. So I did the following in the spirit of play. I'm calling it "Cheese Doodle In Clay" (no cheese was harmed in the making of this sculpt) --
All this technical work. It's good knowledge to have but is not what I want to do ultimately. I much prefer a sort of 'abstracted realism' approach at this point in my aesthetic sensibility. The other thing about doing technical "copy from sight" exercises is that they lack the kind of generative creativity I crave. Nachmanovitch writes, "Competance that loses a sense of its roots in the playful spirit becomes ensconced in rigid forms of professionalism." Precisely. So I did the following in the spirit of play. I'm calling it "Cheese Doodle In Clay" (no cheese was harmed in the making of this sculpt) --.JPG)
Thursday, September 30, 2010
Thursday, September 23, 2010
The changes may not be all that apparent in this photo, but this is 6 more hours of work from yesterday's photo. I spent most of the day on the jaw, around the nose and at the zygomatic arch. The instructional DVD (which I've completely abandoned now) had the viewer take measurements of their own skull at different key points. I had wondered how accurate those would be given the thickness of skin and muscle, but trusted the guy on the video. But today as I worked from the models it became apparent that my sculpture was larger than life-size. Not by much (maybe 1/2", give or take), but enough to cause some difficulty when working from the life-sized models. So I did a lot of scraping down to get it a little more in sync. It's still larger than the models, but not by much. I also raised the ear hole about half an inch and took off about an inch from below the occipital bone, behind the mastoid process (which you can't see in this photo), which may mean I have to rework the cervical vertebrae. We'll see.
.JPG)
Wednesday, September 22, 2010
Today I chucked the instructional DVD I've been working with and instead just referred to the skull models I have. The DVD has it's merits (led by a guy who does a lot of CGI) in that it was good for the first part of the sculpt, figuring out the general planes and proportions. But now that I'm getting down to the nitty gritty it's much better to be working with an actual model. I mostly reworked and refined the cranium today refining the generalized CGI-like planes for a more precise realism. I also retooled all of the facial features. It's a bit of a challenge as I have two skull models that are quite different (one male, one female, and I think some ethnic differences as well), plus I'm working off of my own skull's dimensions. So this is more "best guess" than an exact replica of either of the models I have.
.JPG)
A side view -- wish I'd taken some profile pics with the previous incarnations. Haven't touched the cervical vertebrae in a few days, so it's still in "blocked in" phase here:
.JPG)
Tuesday, September 21, 2010
Monday, September 20, 2010
Getting into the smaller details now. Spent most of the day refining planes, both large and small. Some adjusting of the eye and nose holes. Lots of work around the mouth and jaw, and also starting to delineate the cervical vertebrae. Next session I'll focus on the teeth, which I anticipate will be highly tedious. But it must be done, and I want to do it. It's just going to involve lots of tiny work, with my tiniest tools. And I think I'm still off with much of the jaw and teeth-planes, so I'm sure there will be more adjusting of the form.
.JPG)
Lovely Seattle morning (if, like me, you love this kind of weather). Gray and a bit blustery. All day I could hear the clanging of cables against the sailboat masts as the wind had it's way with them. The afternoon cleared to some sun and a beautiful fall day.
.JPG)
Thursday, September 16, 2010
.JPG)
Wednesday, September 15, 2010
Further along although still dealing with primitive planes of the head. I think the ghost of my half-size skeleton is haunting me on this one (hint: I've named him Massive Jaw Jim). That big jaw will be much-reduced in the coming week. I'm also struggling mightily with the eye sockets, but this is good for me. It's exactly what I need to be learning -- the underlying structure of the eyes. A lot of tweaking and reworking in the immediate future on this one --
.JPG)
Tuesday, September 14, 2010
.JPG)
Friday, September 10, 2010
beautiful black

Wow -- look at that beautiful black ink! I took this photo after it had set for a short while. I can't wait to try it out. I forgot to mention -- I used 5 oz. of iron sulfate to mix with the gall water. But with so many different and wildly varying recipes, it's all just guessing and averaging between them.
Iron gall ink, part 2
I finally braved the goo! I'm sparing you the gory pictures, but it wasn't as bad as I thought it'd be. I strained the ground gall into a bowl (see picture below, and yes that's exactly what it looks like -- thankfully it doesn't smell like that). Then I mixed the ground galls with another cup of water, swished it around and strained it again. Finally, I took out handfuls of the mush and squeezed them hard in my hand to get the last of the liquid out. After it was all said and done I had about 5 or 6 cups of gall liquid.
.JPG)
I picked up some iron sulfate from Seattle Pottery, which is the yellow powder in the white bowl below. The matter of obtaining iron sulfate hasn't been an exact science. If you do a Google image search for "iron sulfate" you'll see a lot of pictures of green powder, some pictures of a white powder, and a few pictures of a yellow powder. Which is the one I need? I'm going with the yellow stuff from the pottery supply place. We'll see how it turns out. So far, so good --
.JPG) My apologies for the fuzzy picture below. Had I known the liquid would change so quickly and dramatically after adding the iron sulfate I would have tried harder to take some good before pictures. But below is the best one I have. Prior to adding the iron sulfate, the gall liquid was a reddish-brown color and very watery and transparent --
My apologies for the fuzzy picture below. Had I known the liquid would change so quickly and dramatically after adding the iron sulfate I would have tried harder to take some good before pictures. But below is the best one I have. Prior to adding the iron sulfate, the gall liquid was a reddish-brown color and very watery and transparent --.JPG)
After adding the iron sulfate it changed quickly right before my eyes, becoming a very dark black color and thickening somewhat. At first it was brown-black but as it sat it became more purple/blue-black. It even stained my fingers black as I worked with it. Definitely potent stuff, at least in terms of staining. It's a little hard to tell in this photo, but this is what it looked like after adding the iron sulfate --
.JPG)
Now to set it aside to sit for a few more days before the final step...
Thursday, September 9, 2010
back to the studio
Gearing up for the next step of the iron gall ink. I picked up some iron sulfate and now have to psych myself up to strain out that moldy mess of gall goo.
In the meantime it's back to the studio. Spent a good day cleaning and organizing it. Now it's on to new projects. The first is pictured below. Any ideas what this is? It'll become apparent soon enough. Spent the past two days building this thing. It was truly a headache, what with my lack of proper tools and all the time spent dealing with clueless people who work at hardware stores and yet know nothing about tools or construction. grrrr... But I finally got this thing built. I even managed to bend that 5/8" thick threaded rod with the help of some length of pipe.
.JPG)
Monday, September 6, 2010
"Delight is a secret. And the secret is this: to grow quiet and listen; to stop thinking, stop moving, almost to stop breathing; to create an inner stillness in which, like mice in a deserted house, capacities and awarenesses too wayward and too fugitive for everyday use may delicately emerge. Oh, welcome them home! For these are the long-lost children of the human mind. Give them close and loving attention, for they are weakened by centuries of neglect. In return they will open your eyes to a new world within the known world, they will take your hand, as children do, and bring you to where life is always nascent, day is always dawning. Suddenly and miraculously, as you walk home in the dark, you are aware of the insubstantial shimmering essence that lies within appearances; the air is filled with expectancy, alive with meaning; the stranger, gliding by in the lamp-lit street, carries silently past you in the night the whole mystery of his life...
Delight springs from this awareness of the translucent quality in all things, whereby beauty as well as ugliness, joy as well as pain, men as well as women, life as well as death -- the grinding clash of opposites between whose iron teeth all systems of philosophy are crushed at last to pulp -- are seen as symbols; in the true meaning of a symbol, whose Janus-like face contains at once that which exists in time and space, and that which transcends it."
--Alan McGlashan, "The Savage and Beautiful Country", 1967

Monday, August 23, 2010
Iron gall ink, part 1.5
The gall/water mixture is still fermenting. The weather in Seattle has cooled so I might leave it to sit for awhile longer to make sure it's good and ripe. I found that the ratio of one part ground gall to four parts water was not wet enough to allow for the fermentation process. Once the galls soaked up all the water it made more of a thick paste and was just sitting and drying out rather than fermenting. So I cut the paste in half and added 30 ounces of water to the second half, making the ratio more like 7.5 ounces gall to 90 ounces water (about one part ground gall to 12 parts water, if my meager math skills aren't failing me). Put the bowl back out to sit some more and it's looking much more promising now. Stay tuned...
Thursday, August 19, 2010
Iron Gall Ink, part 1
Sometimes I wonder if I a medieval monk in a former life? I have such a fascination with "how things used to be done." Or maybe it's just the deep satisfaction of making things from scratch as opposed to picking up a shiny plastic bottle of modern chemistry at the art store. I simply prefer to work with materials made from my own hands, whose ingredients are known and natural and completely pronounce-able, and which can be executed with humble means. And so it is with the latest project in the studio: iron gall ink.
I was down in southern Oregon recently, spending a lot of time in the dry woods there. Scrub oak abounds and every now and then you see these golf ball and baseball-sized pale tan bulbs on them. Some sort of fruit? Nature's christmas ornaments? It turns out they're oak galls -- dry, hard, gourd-like growths on a very small percentage of oak trees. These growths are the result of the tree trying to protect itself from a parasite, the gall fly, which is a generic term for any insect that causes a plant to produce galls (oak aren't the only trees to make these). Being the "medieval art techniques" geek that I am, I remembered that these galls were a key ingredient in the way ink used to be made so I brought home a big bag of them.
.JPG)
What makes these important for ink making is their high level of gallotannic acid, which (correct me if I'm wrong) is the thing that keeps the ink from fading. Probably also the reason why red wine stains so badly, due to the tannic acids (this coming from a Google-armchair-chemist so don't quote me!). Anyway, most of the galls are a pale tan color, but color variations include beautiful blushes of pink and peach, to dark brown and even nearly black --
.JPG)
When I first brought them home they were so pretty and pristine. I could have filled a big bowl with them, making a nice centerpiece. But I kept them in the bag for a day or two as I gathered info and ingredients. When I went to open the bag I was surprised to find that the galls were full of holes! Not only that but when I opened the bag a couple of moths flew out. Apparently their larvae had been living inside the galls and had hatched and chewed their way out. At the bottom of the bag were some telltale larva casings --
.JPG)
Pretty voracious eaters, too. White most of the holes were very small (maybe 1/8" in diameter at most), some were quite large --
.JPG)
But the moths had their chance to escape. I let the galls sit out a few more days to make sure the moths were gone. Soon it was time to proceed with the ink making. The monks of old would have used a mortar and pestle, but if they'd had these oh-so-useful electric spice grinders I'm sure they would have sung praises to the heavens for the miracle of technology, probably drawing little Cuisinart cartoons in the margins of their manuscripts with happy little monk-dudes dancing nearby --
.JPG)
Big bowl of ground oak galls -
.JPG)
Since iron gall ink was pretty much the only ink used for centuries, recipes are numerous. But typical of really old recipes like that, every single one is different, often drastically so. I've decided to go with one of the fermented recipes as I read they make the darkest ink. Since I've got a considerable amount of ground gall I'm going to use a recipe that uses a high proportion of gall-to-water. Since I don't have a bucket of rainwater sitting around, I'm using distilled water. Four parts water to one part ground gall, by weight (below I'm using 60 oz. water to 15 oz. gall)
.JPG)
Now to set it in a sunny corner for a few days or a week to ripen it. I just hope the stink doesn't get out of control.
Friday, July 30, 2010
Art to the Nth degree
And if you take art to the Nth degree and raise it to the level of the esoteric, you get Claudio Corallo's art. That's right.. chocolate. But this is chocolate like you've never had before. This is the pure cacao plant reverence. Seriously. This is beyond chocolate.
Tuesday, February 16, 2010
You are not surprised at the force of the storm—
you have seen it growing.
The trees flee. Their flight
sets the boulevards streaming. And you know:
he whom they flee is the one
you move toward. All your senses
sing him, as you stand at the window.
The weeks stood still in summer.
The trees' blood rose. Now you feel
it wants to sink back
into the source of everything. You thought
you could trust that power
when you plucked the fruit;
now it becomes a riddle again,
and you again a stranger.
Summer was like your house: you knew
where each thing stood.
Now you must go out into your heart
as onto a vast plain. Now
the immense loneliness begins.
The days go numb, the wind
sucks the world from your senses like withered
leaves.
Through the empty branches the sky remains.
It is what you have.
Be earth now, and evensong.
Be the ground lying under that sky.
Be modest now, like a thing
ripened until it is real,
so that he who began it all
can feel you when he reaches for you.
-- Rainer Maria Rilke

"Tree Whisperer", by Sherer and Ouporov (egg tempera, acrylic, gold leaf on poplar and birch, 2005)
Thursday, February 11, 2010
When you want to give something presence, you have to consult nature.
- Louis Kahn, architect
Searching out the lines that already exist interests me more than imposing new ones.… Pressing leaves into the bark of a tree produces lines dictated by the tree's growth patterns. The intention is not just to make a line, but to draw the change, movement, growth and decay that flow through the place.
- Andrew Goldsworthy, artist

(Andrew Goldsworthy image)
My time at the Sandpoint studio is coming to an end. Rumor has it the new developers want the place vacated by May 1st. I will miss it there, with the waterfront and the old wood floors and high open-beamed ceiling. But it will be nice to have my work back home again. No more commuting, no more too-hot-in-summer and too-cold-in-winter, and I can wander down in the middle of the night to work if I want. That will be nice. Still a lot to do to finish off the basement, but it's coming along. I have my work cut out for me these next few months.
Monday, February 1, 2010
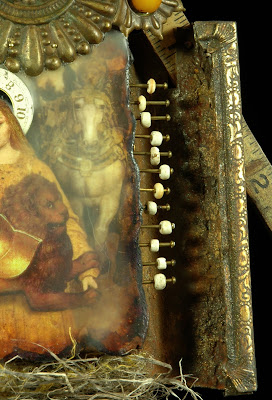
Been working hard at the studio, all to finish this piece for an upcoming auction. The title of the work is "The Measure of Her Fortitude." It's a mixed media piece incorporating found objects including a quail egg, sparrow's nest, Victorian brass hardware pieces, antique ruler, fossilized nautilus shell, animal bone, Bakelite and bone beads, beeswax, tarot card, watch face, hemp thread, vintage rusted tin container, old metal frame, powdered pigments, wood, wire, nails, paint and glue. It measures about 15" in height. There's quite a bit of depth and dimension to the piece which was hard to capture completely in the photos, so I've uploaded two very differently lit pictures to try to convey this. First, with top-down lighting --
+edit.jpg)
And this one, lit from both sides which emphasizes the depth of the frame behind the central image --
+edit.jpg)
.jpg)
.jpg)
.jpg)
.jpg)
+edit.jpg)
I had so much fun doing this. It's actually a re-working of a piece I started in a deMeng workshop last fall and which I even uploaded a picture of here in this blog a few months ago.
My favorite element is the sparrow's nest material tucked into the lower part, inside a turned-up Victorian drawer pull. The color of the nest was much grayer than I wanted so I mixed in some gold colored hemp thread to warm it up. It worked out quite well (below hangs an amber Bakelite bead and an animal's femur bone) -
.jpg)
Up on top is the nautilus shell and the quail egg. I devised a way to reinforce the egg so that breakage is unlikely, even though it sits freely on the wire and can rotate around. I really love sculpture with moving parts -
.jpg)
And below is another "moving part" element -- the bone beads threaded onto brass nails on either side of the central image. The beads move back and forth giving the whole thing an abacus-like feel. Between the beads and the metal frame piece you can just make out the textured surface where I tried to match the rusted metal. I tried to keep as much of the rusted metal showing, but as I had to affix the metal frame pieces with some epoxy putty I needed to cover that up to match the rusted tin. Powdered pigments really helped with this --
.jpg)
And here's the back of the piece, showing the backside of the old rusty tin. I love that burnished and rusted gold surface and didn't want to hide it, although the other side of the piece is just rusted tin with no old gold paint on it. You can also see some of the ways I attached all the pieces together. I used rivets (hard to see, but they're there) to attach the wood rulers to the tin, and brass nails to secure the wood piece in the center (the tarot image is on top of the wood). Down at the bottom are a couple of Lowes-bought brass machine screws and nuts. They were shiny-brand-spanking-new, which I burnished on the front side of the piece to match the aged look, but on the back here I just left them new and shiny. I threaded some brass wire through holes drilled into the tin to create something to hang the piece on a wall -
.jpg)
Sunday, January 17, 2010
I'm fascinated by illuminated manuscripts. So much to love about them, from the sacred texts that are made even more sacred through artistic embellishment, to the archaic secrets behind ink formulas and quills, to the gold leaf and the preparation of the animal skin vellums. And what got me started again with this interest? I’ve recently been reading C.G. Jung’s “Red Book”. It was made public for the first time last month. Jung, of course, touches on some other favorites--mythology and symbolism--which were richly portrayed in medieval times, the peak of production for illuminated manuscript. All of these converging interests of mine, going round and round, circling in toward that which draws me strongly, artistically. Here are some images from Jung's "Red Book"

So I'm prowling the internet again, searching for images of ancient texts, and tonight I hit the mother lode. It seems that palaeographists are so thankfully passionate about their discipline they’ve built enormous (and, best of all, free) online image libraries of historical texts and manuscripts. The sites take some patience to navigate and presume the viewer knows more than a little about the subject, so you have to do some poking around to get to the images. My favorite site is the Digital Scriptorium -- http://www.scriptorium.columbia.edu/. But unless you happen to know the precise name of a manuscript or the collection it’s held in, it’s easiest to start by clicking “more highlights” on the home page. Initially I gaped at everything without discrimination, but after awhile it got easier to discern the high quality manuscripts from the low. While all are wonderous, a few stand out as true works of art. The Book of Kells is of course familiar to most, but of the hundreds I looked at my favorite by far is a manuscript at Harvard University’s Houghton Library -- the Calderini Pontificale dating from the late 14th century Italy. It’s undoubtedly one of the most finely executed illuminated manuscripts in existence. Here are some goodies --
.jpg)
.jpg)
Subscribe to:
Posts (Atom)